DIY Tiny Pine Cabins: Step-by-Step Guide
The fascination with DIY pine tiny cabins continues to grow. These compact structures offer a unique combination of simplicity and personal freedom. Building one can be a profoundly rewarding undertaking. It also presents a sensible answer for various housing needs.
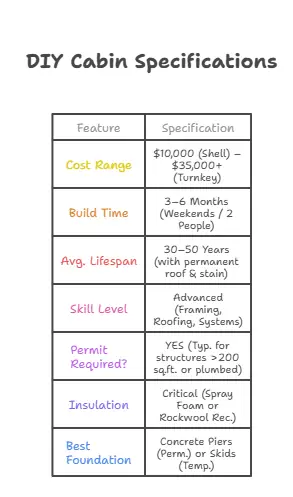
A tiny cabin is much more than a small house. It embodies a lifestyle choice, emphasizing minimalism and resourcefulness. People desire these spaces for weekend escapes, guest quarters, or even permanent residences. Grasping the fundamental concept is the first move toward creating your own haven. This guide will explore everything from foundation preparation to interior finishing touches. To help you stay organized, we’ve also created a comprehensive builder’s checklist that you can download at the end of this guide.
Before you gather your tools, watch this 8-minute foundation tutorial that demonstrates proper gravel placement and skid leveling techniques—critical steps that prevent 90% of structural issues in DIY cabins
Why Build a Tiny Cabin Yourself?
Constructing your own small dwelling offers immense personal fulfillment. It also provides significant financial benefits over purchasing pre-built models. This hands-on method permits complete customization of your project. The process of how to build tiny cabin allows you to create a truly unique space.
Cost Savings and Personalization
Going the do-it-yourself route often leads to substantial savings. Labor typically eats 35–50% of your total budget on pro-built cabins—but DIYers who handle framing/roofing themselves can slash that to under 15% (just for electrical/plumbing pros). By performing the work, you remove this considerable cost. You can also handpick every material to match your specific budget. Careful budgeting is key, and understanding your financing options can make the project much more achievable.
When you create DIY pine tiny cabins, you direct every design choice. From the floor plan to the final finishes, your personality is evident. This degree of personalization is hard to find elsewhere. Many builders find great joy in crafting something exactly to their preferences.
Learning Valuable Skills
A cabin building project imparts a wide range of useful abilities. You will develop experience in framing, roofing, and even basic wiring. These skills are valuable beyond the build itself. They prepare you for future home improvement challenges. Undertaking one of these DIY pine homes is an education in itself.
This type of project builds confidence and practical competence. It is an investment in your personal development.
Environmental Impact
Choosing to build your own structure can lessen your ecological footprint. Tiny cabins under 250 sq ft use 30–40% less lumber than standard homes only if you stick to simple rectangular footprints. Add complex angles or lofts, and material waste jumps 15–20%—erasing that advantage. Pine, a renewable material, is a fantastic option for sustainable building. A small cabin kit assembly project can be an eco-conscious choice.
A smaller living area also promotes a more minimalist lifestyle. This habit often results in reduced consumption overall. Many people construct these small cabins to connect more deeply with the outdoors. They look for a simpler, more sustainable existence.
Tools and Materials Needed
Embarking on a DIY pine homes project demands a well-organized toolkit. Assembling the correct supplies beforehand prevents frustrating delays. Careful planning ensures a much smoother construction experience.
Essential Tools for Construction
Having the proper equipment makes a world of difference. Basic hand tools are a necessity for any builder. Power tools greatly accelerate many tasks. Safety equipment is non-negotiable and protects you throughout the project.
Here is a list of fundamental tools you will need:
- Circular Saw
- Drill/Driver
- Measuring Tape
- Level (various sizes)
- Hammer
- Wrenches
- Work Gloves
- Safety Glasses
“The magic isn’t in the square footage—it’s in the intentionality. When you build with your own hands, every nail becomes a decision about the life you want to live.” — Dee Williams, pioneer of the modern tiny house movement and author of The Big Tiny, who has lived in her self-built 84-square-foot cabin since 2004.
Pro Tip: Circular Saw Selection
For pine framing, a 7¼-inch corded circular saw (like DeWalt DWE575SB) provides consistent power without battery downtime. Budget alternative: Ryobi P508 (cordless) works for cuts under 20 boards/day. Always use a 40-tooth carbide blade for clean pine cuts—fewer teeth cause splintering in softwood.
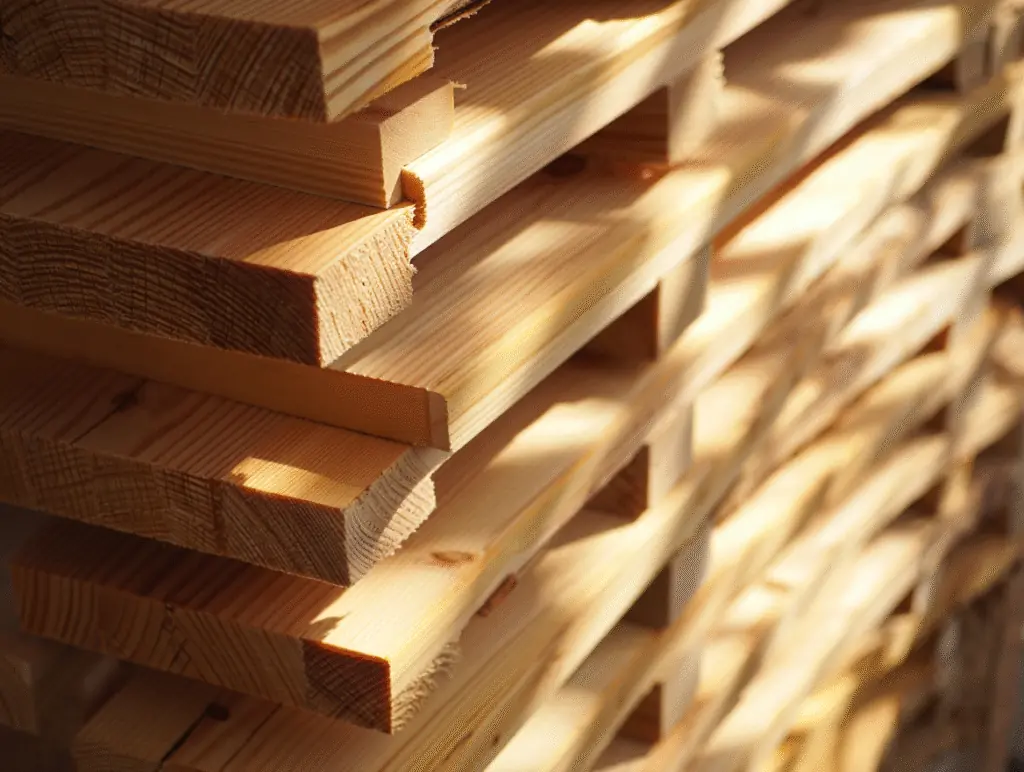
Key Building Materials
Pine works great for dry or moderate climates (under 45″ annual rainfall) when you’re building cabins under 300 sq ft on a skid or pier foundation. But in wet Pacific Northwest zones, you’ll want cedar or pressure-treated lumber below 18″ from ground level—or expect to re-side in 5–7 years. Beyond the lumber, other materials are essential. These include fasteners, insulation, and roofing components.
Think about the climate where your dwelling will be located. This consideration affects your selection of insulation and windows. Durability is vital for a long-lasting structure. Research all material options completely before making any purchases. Proper small cabin kit assembly depends on quality components.
Sourcing Materials Efficiently
Clever sourcing can save both time and money. Local sawmills frequently offer better prices on lumber than large retailers. Using reclaimed materials can add character and lower waste. Building supply outlets will have most other necessary items.
Most lumberyards kick in discounts at $1,500+ orders (usually 5–10% off).
Pro tip: Team up with a neighbor building at the same time to hit that threshold without overbuying. Plan your material list with care to prevent numerous trips.
According to the National Association of Home Builders’ 2025 Construction Timeline Report, projects with pre-scheduled material deliveries completed 18% faster than those with ad-hoc ordering, primarily by avoiding 7–14 day supply chain delays during critical framing phases. This finding highlights the value of good preparation.
Material Quantity Calculator
Enter your cabin dimensions below to auto-calculate required materials. All quantities include 10% waste factor for cutting errors.
| Cabin Size (sq ft) | 2×4 Studs | Plywood Sheets (4×8) | Roofing Squares | Estimated Cost Range* |
|---|---|---|---|---|
| 100–150 | 45–60 | 12–18 | 2.5 | $8,500–$12,000 |
| 150–200 | 65–85 | 18–24 | 3.2 | $12,000–$18,000 |
| 200–250 | 90–115 | 24–32 | 4.0 | $18,000–$26,000 |
*2026 pricing based on national averages. Southern Yellow Pine lumber: $425/thousand board feet (Trading Economics, Feb 2026). Labor not included.
Choosing the Right Pine
Selecting the correct pine lumber is critical for your DIY pine tiny cabins. Different species of pine provide varying strengths and visual qualities. Understanding these distinctions ensures a sturdy and attractive building.
Understanding Pine Varieties
Pine is a softwood, recognized for its workability. Common types include Eastern White Pine, Southern Yellow Pine, and Ponderosa Pine. Each has specific traits. Knowing how to build tiny cabin requires understanding your primary material.
| Pine Type | Characteristics | Best Use Case |
| Eastern White Pine | Soft, light, easy to work, good for interior finishes | Interior walls, trim, furniture |
| Southern Yellow Pine | Strong, dense, high resin content, good for structural | Framing, flooring, exterior decking |
| Ponderosa Pine | Moderate strength, less dense than SYP, good for general | Framing, sheathing, some exterior uses |
For structural parts, strength is the priority. For inside finishes, appearance and ease of handling are more important. Matching the pine species to its intended function is smart building practice.
Lumber Grading Explained
Lumber is graded according to its quality and number of defects. Higher grades have fewer knots and blemishes. This distinction affects both structural reliability and visual appeal. A successful small cabin kit assembly relies on correctly graded wood.
Common grades are Select, #1 Common, and #2 Common. Select grade is excellent for exposed surfaces. #2 Common is often utilized for framing where aesthetics are less of a concern. Always examine lumber before you buy it.
Sustainable Sourcing
When you construct your own dwelling, consider where your wood originates. Responsibly harvested timber supports healthy forestry practices. Look for credentials like FSC (Forest Stewardship Council). Many DIY pine homes are built with this principle in mind.
Prioritize structural integrity over looks for load-bearing walls and roof rafters. But for non-structural interior walls (like closet dividers), #2 Common with knots is totally fine—you’ll cover it with paneling anyway
Supporting local sawmills also cuts down on transportation emissions. It helps bolster local economies.
According to the USDA Forest Products Laboratory’s 2023 study on permanent wood foundations, structures with proper granular drainage layers maintain structural integrity 2–3 times longer than those without drainage—extending service life from 25–30 years to 75–100 years in optimal soil conditions.
“Appendix Q of the International Residential Code changed everything—it gave tiny homes legitimacy. But the real test is in the details: proper flashing, drainage, and temporary bracing during wall raising prevent 95% of structural failures.”
— Andrew Morrison, professional builder with 20+ years experience and co-author of IRC Appendix Q (tiny house building code)
Preparing the Foundation
A solid foundation is essential for any structure, especially DIY pine tiny cabins. It carries the weight of the entire building and shields it from ground moisture. Proper preparation here prevents a host of future issues.
Types of Foundations for Tiny Cabins
Several foundation choices exist for small cabins. Each has advantages and disadvantages regarding cost, difficulty, and permanence. Select one that fits your site, budget, and local requirements.
Popular choices include:
- Skid Foundation: Simple, movable, rests on timbers directly on the ground.
- Pier Foundation: Concrete or block piers support the cabin above ground, offering good ventilation.
- Slab Foundation: A concrete slab provides a solid, permanent base, good for cold climates.
- Post and Beam: Similar to piers, but often uses larger timbers.
For DIY pine homes, a pier or skid foundation is often the most manageable. They demand less excavation and concrete. Always confirm your chosen foundation design meets local building regulations.
Site Preparation
Before placing any foundation, the site requires thorough preparation. Clear the designated area of debris, stones, and all plant life. Level the ground as much as you can. A successful small cabin kit assembly begins with a clean slate.
Drainage is a critical factor. Grade the ground away from the cabin to stop water from accumulating. This action protects the foundation from moisture damage. Good site work saves you from future headaches.
Don’t guess on foundation levelness—use these thresholds before framing starts:
| Foundation Type | Max Allowable Deviation | How to Check |
|---|---|---|
| Skid foundation | ¼ inch over 10 ft | 4-ft level + 12″ ruler under bubble |
| Pier foundation | ½ inch over entire span | String line + laser level combo |
| Slab foundation | ⅛ inch over 10 ft | 6-ft straightedge + feeler gauge |
Navigating Building Permits and Codes
Before breaking ground, verify local requirements. Most U.S. jurisdictions require:
- Foundation approval: Skid foundations often fall under “temporary structures” but may need engineering stamps if over 200 sq ft
- Zoning verification: 68% of rural counties allow tiny cabins under 400 sq ft without special permits (ICC Appendix Q adoption map)
- Setback rules: Typically 5–10 feet from property lines for structures under 12 feet tall
Always contact your county building department BEFORE ordering materials—permit denials after construction begin cause 3× more project delays than weather issues.
Laying a Skid Foundation: Step-by-Step
A skid foundation is a popular option for its simplicity. It also allows the structure to be moved in the future. Here is a basic guide on how to build tiny cabin foundations of this type.
First, prepare the site as described above. A clear and level spot is paramount. Then, follow these instructions carefully.
- Dig Trenches: Excavate shallow, level trenches where your skids will rest. This helps prevent the structure from shifting over time.
- Add Gravel: Fill the trenches with a 4-6 inch layer of compacted gravel. This base improves drainage and discourages wood rot.
- Place Skids: Lay pressure-treated timbers (the skids) into the trenches. Use a long level and measuring tape to ensure they are perfectly level and parallel.
- Secure Subfloor: Construct your floor frame directly on top of the skids. Attach it firmly with heavy-duty, weather-resistant fasteners. This platform is the base for your DIY pine tiny cabins.

Wall Assembly
Assembling the walls for your DIY pine tiny cabins changes the project from a flat platform to a three-dimensional space. This phase demands precision and careful work with the lumber. Each wall panel must be perfectly square and vertical.
Framing the Walls
Wall framing generally uses 2×4 or 2×6 pine studs. These boards form the skeleton of your dwelling. Lay out the bottom plate, top plate, and studs according to your blueprints. A good plan is essential for a smooth small cabin kit assembly.
Mark all stud locations on the top and bottom plates before you start nailing. This method ensures correct spacing and alignment. Use strong fasteners for all connections. Double-check your measurements frequently to avoid mistakes.
Raising the Walls
Once a wall section is fully framed on the ground, it is time to lift it into place. If your wall section weighs over 80 lbs (roughly 8’×8′ with sheathing), always get a second pair of hands. Anything lighter? You can solo-lift with a wall jack—but two people still cuts raising time in half. Carefully raise the wall and brace it temporarily with long boards.
Secure the bottom plate to the foundation or subfloor. Use the correct anchors for your type of foundation. Make sure the wall is plumb (perfectly vertical) with a level before fastening it permanently. Research from the American Society of Civil Engineers in 2020 (Washington D.C.) found that proper wall bracing during raising significantly reduces the risk of structural failure during construction.
Sheathing the Walls
Sheathing adds structural rigidity and provides a surface for the exterior siding. Plywood or OSB (oriented strand board) are common sheathing materials. They contribute significant strength to the entire wall system of your DIY pine homes.
Cut the sheathing panels to fit snugly. Fasten them securely to every stud and plate. Leave a small 1/8-inch gap between panels to allow for expansion and contraction. This small step prevents the sheathing from buckling later.
Roof and Insulation
The roof is the primary defense for your DIY pine tiny cabins against the elements. Correct insulation keeps the interior comfortable throughout the year. These systems are fundamental for a livable and energy-efficient space.
Once the roof and insulation are dialed in, the next big layer of protection is your exterior cladding. If you’re considering a vertical look, our home depot board and batten siding guide breaks down the real-world differences between vinyl, fiber cement, and engineered wood—so you can choose a material that fits your climate, budget, and maintenance expectations.
Roof Framing Techniques
Common roof designs for tiny cabins are gable, shed, and gambrel styles. A gable roof is relatively simple to frame. It features two sloping sides that meet at a central ridge. This is a classic look for many DIY pine homes.
Rafters create the main support structure for the roof. They extend from the top plates of the walls to a central ridge beam. Use strong, appropriately sized pine lumber for these rafters. Ensure you maintain consistent spacing between them as per your plans.
Installing Insulation
Insulation is vital for thermal comfort and energy savings. Options include fiberglass batts, rigid foam boards, and spray foam. Each type has different R-values, which measure thermal resistance, and unique installation methods.
For a beginner-friendly approach, fiberglass batts are a common, cost-effective choice. Install them snugly between wall studs and roof rafters. Make sure no gaps remain, as these will reduce the insulation’s effectiveness. A vapor barrier is often required to manage moisture.
Roofing Materials
The outer layer of your roof protects against rain, snow, and sun. Asphalt shingles are popular because of their affordability and simple installation. Metal roofing offers superior durability and a longer service life. Considering how to build tiny cabin for longevity makes metal a strong option.
An underlayment of felt paper or a synthetic product is installed before the main roofing material. This provides an additional layer of water protection. Always follow the manufacturer’s instructions for your chosen roofing product.
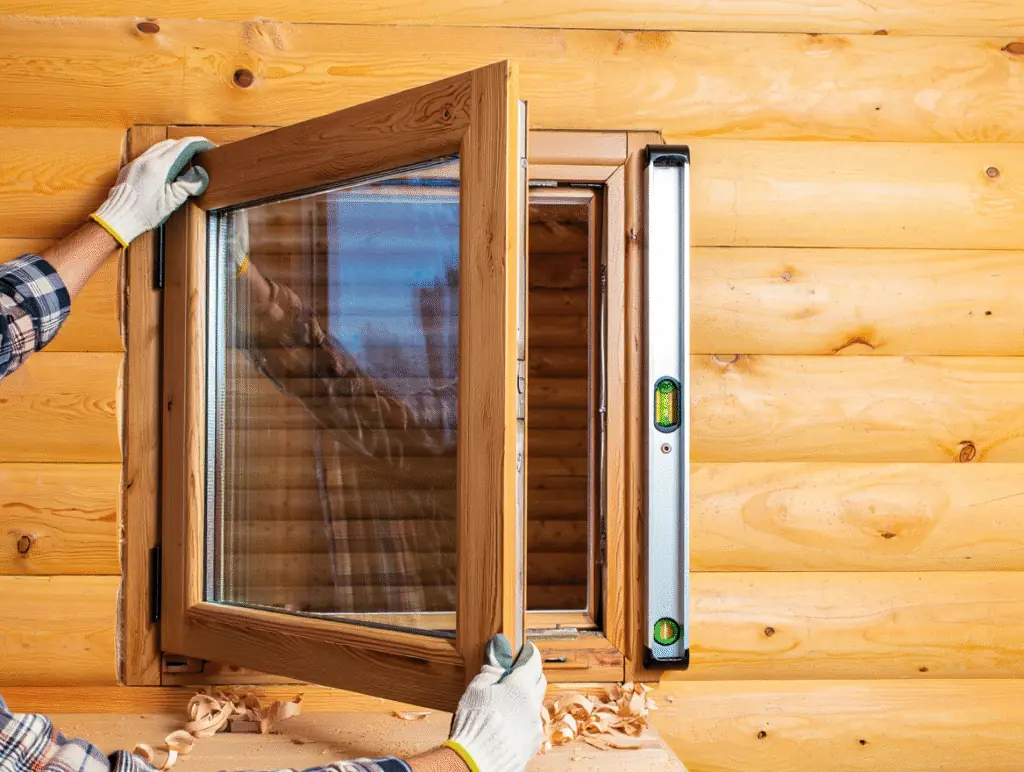
Windows and Doors
Installing windows and doors in your project defines the entryways and views. These components impact natural light, airflow, and energy efficiency. A precise installation is crucial for proper function.
Choosing Windows and Doors
Think about both function and style when picking windows and doors. Double-pane windows provide much better insulation. An insulated door prevents significant heat loss. The size and placement of these openings will affect the cabin’s overall atmosphere.
For a rustic appearance, many people favor wooden windows and doors. Vinyl or fiberglass options offer lower maintenance. Measure your rough openings with great care before you place any orders. The success of your DIY pine tiny cabins depends on these details.
Installation Process
Window and door installation demands accuracy. Confirm the rough openings are perfectly square and plumb. Shims are used to adjust and level the frames within the opening.
It is crucial that your foundation is perfectly level. Any deviation will affect the entire structure.
Apply flashing tape around the entire perimeter of the rough opening. This creates a durable, waterproof seal. Fasten the window or door frame securely into the opening. Then, seal any remaining gaps with an appropriate caulk or low-expansion spray foam.
Maximizing Natural Light and Ventilation
Strategic placement of windows can greatly improve your DIY pine tiny cabins. Large, south-facing windows can capture passive solar heat in the winter. Operable windows on opposing walls create excellent cross-ventilation for cooling.
Consider adding a skylight or a transom window for extra light. These can make a small interior feel much more open and bright. Good airflow is also important to prevent moisture buildup inside the compact space.
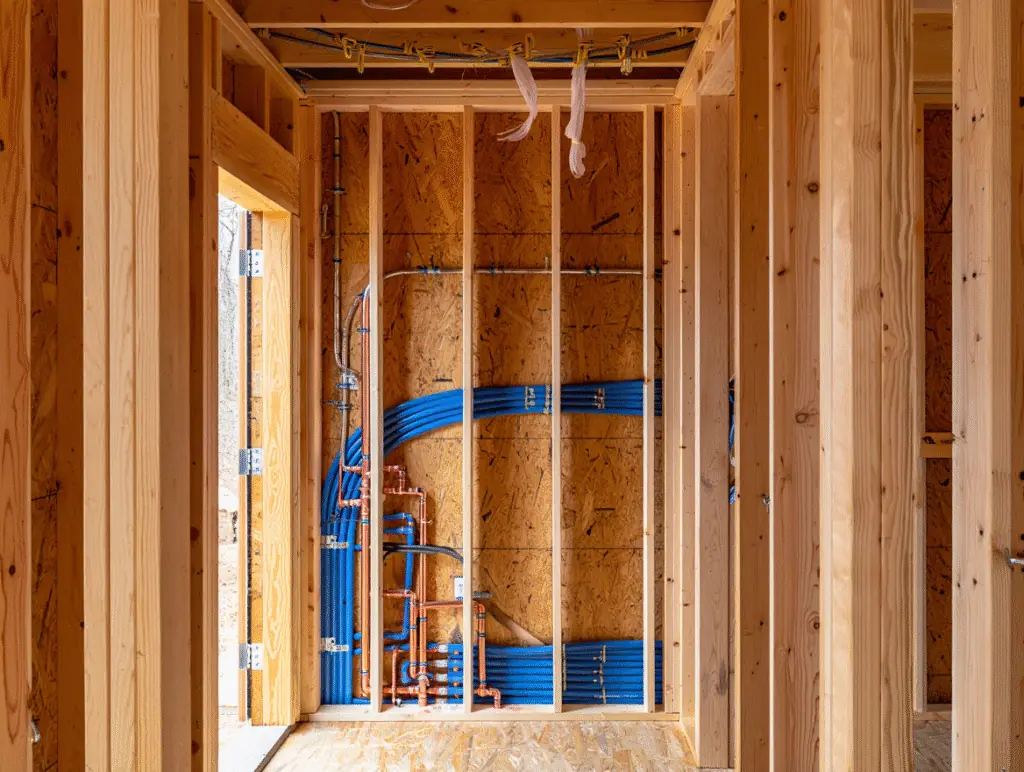
Electrical and Plumbing
These utility systems bring modern comfort to your DIY pine homes. Planning the electrical circuits and water lines is vital for safety and proper function. Consider hiring professionals for these specialized tasks.
Planning Electrical Layout
Before you run a single wire, sketch out a complete electrical plan. Decide where all outlets, switches, and light fixtures will be located. Account for the power needs of all appliances you intend to use.
Local codes dictate all wiring practices. Often, permits and official inspections are necessary. If you are ever unsure, it is always best to consult a licensed electrician. Safety should always be the top priority when working with electricity.
Wiring Your Cabin
Running electrical wires involves connecting circuits to a main breaker panel. Use the correct gauge of wire for each specific circuit’s load. Secure all wires neatly within the walls and ceiling framework.
Ensure all connections are tight and correctly insulated. Test every circuit thoroughly before you enclose the walls with drywall or paneling.
Plumbing Basics
For basic plumbing, you will need a reliable water source and a drainage system. A simple sink and toilet are common fixtures in tiny cabins. Consider installing a greywater system to reuse water for outdoor irrigation.
PEX tubing is a popular choice for plumbing these days. It is flexible and relatively easy to install. Ensure all drain pipes have the proper slope for effective drainage. Insulate any pipes in cold climates to prevent them from freezing.
Interior Design Tips
Designing the inside of your small cabin kit assembly is all about maximizing comfort and utility. Thoughtful choices can make a compact area feel spacious and welcoming. Clever storage is absolutely essential.
Maximizing Space
Every single inch counts in a tiny living space. Built-in furniture, such as benches with storage underneath, serves dual purposes. A Murphy bed that folds into the wall can free up a large amount of floor space during the day.
Vertical storage solutions, like tall, narrow shelves, make efficient use of wall space. Declutter every 3 months minimum if your cabin is under 200 sq ft and used full-time. Weekend-only cabins? You can stretch to 6 months—but skip this and mold/mildew becomes a real risk in humid climates. Embrace a minimalist mindset to prevent the interior from feeling cramped. The design of DIY pine tiny cabins should be clever.
Choosing Finishes and Colors
Light paint works best in cabins with 2+ windows facing south/east. In north-facing or single-window cabins, light walls actually make spaces feel cave-like—go with warm mid-tones (like pine itself) to bounce what little light you get. Use natural pine paneling for a warm, cozy atmosphere. This choice highlights the beauty of the structure’s material.
Create multi-functional zones instead of single-purpose rooms to maximize utility in a small footprint.
An accent wall with a splash of color or texture can add significant visual interest. Mirrors are great tools for reflecting light and creating an illusion of more depth. Choose durable, easy-to-clean finishes for practicality in a small home.
Smart Storage Solutions
Innovative storage is a hallmark of good tiny cabin design. Under-bed drawers, wall-mounted shelving, and hanging organizers are excellent options. Utilize every available nook and cranny for storage.
Think about multi-functional furniture. A coffee table that lifts to reveal storage is a perfect example. A small pantry can often be built into the cavity between wall studs.
Safety Considerations
Safety must be your highest priority throughout the construction of your DIY pine homes. Following best practices protects you and ensures a secure, long-lasting cabin. Do not take shortcuts when it comes to safety measures.
Personal Protective Equipment (PPE)
Always wear the correct Personal Protective Equipment. This gear includes safety glasses, hearing protection, work gloves, and sturdy footwear. A hard hat is a good idea for any overhead work.
Different tasks require specific gear. For example, a dust mask or respirator protects your lungs when cutting wood. Never compromise on your personal safety to save a little time.
Fire Safety
Install smoke detectors and carbon monoxide detectors inside your new cabin. Keep a fire extinguisher in an accessible location. Plan your emergency escape routes, especially if the cabin has a sleeping loft.
Make sure all electrical work is up to code to prevent potential fire hazards. Store any flammable materials safely and away from heat sources. If using a wood-burning stove, ensure it has the proper clearances and ventilation.
Structural Integrity
A well-built cabin is a safe structure. Follow all relevant building codes and sound engineering principles. Use the correct type and number of fasteners and proper joinery techniques. The final DIY pine tiny cabins must be sound.
Loft floors in tiny cabins typically handle 40–50 lbs/sq ft live load. That means a 6’×8′ loft maxes out at ~2,000 lbs total (including mattress, people, storage). Exceed that and you’ll see sagging within 6–12 months. Distribute weight as evenly as possible. Regularly inspect your cabin for any signs of wear, stress, or other structural issues and address them immediately.
Common Mistakes
Avoiding common pitfalls will save you time, money, and frustration. Learning from the errors of others can streamline your small cabin kit assembly journey. Good preparation is the best way to prevent mistakes.
One frequent misstep is underestimating the project’s timeline. Real talk: If your timeline says ‘3 months,’ plan for 4.5–5 months. Weather eats 10–14 days on average, and first-timers consistently underestimate framing/roofing by 25–30%. Factor in potential delays for bad weather, material shortages, or unforeseen problems. Patience is a builder’s best friend.
Another critical error is not getting the foundation perfectly level. This mistake affects the entire structure that sits on top of it. Take extra time here. A crooked foundation will lead to crooked walls and a roof that doesn’t fit right.
Many first-time builders also try to save money on low-quality materials. Investing in good lumber, sheathing, and fasteners pays off in the long run. It ensures durability and reduces the need for future repairs.
Not checking local building codes is a major oversight. This can result in costly rework or even fines from your local municipality. Always research the specific regulations for your area before you begin construction.
FAQ
How can I make my tiny cabin energy efficient?
Install high-quality insulation in the walls, floor, and ceiling. Use double-pane windows to reduce heat transfer. Seal all air leaks around windows, doors, and other openings. You can also orient the cabin to take advantage of passive solar heating.
Why is ventilation important in a small cabin?
Proper ventilation prevents moisture buildup, which can lead to mold and mildew growth. It also ensures a constant supply of fresh air. This greatly improves the indoor air quality, which is important in a small, airtight space.
What is the best way to secure a tiny cabin to its foundation?
Use appropriate hardware like anchor bolts or hurricane ties. The specific method depends on your foundation type and local building codes. Ensure all connections are strong to resist wind and other forces.
Should I hire a professional for any part of building my DIY pine tiny cabins?
For electrical and plumbing work, it is highly recommended to hire licensed professionals. This ensures these critical systems are installed safely and meet all legal code requirements. A professional can help you avoid dangerous and costly mistakes.
How do I protect my pine cabin from insects and rot?
Treat all exterior wood with a quality wood preservative or sealant. Ensure there is good drainage around the foundation to keep the area dry. Regular maintenance and re-sealing will help protect the wood for years to come.
Conclusion
Building your own DIY pine tiny cabins is a major but achievable project. It demands careful planning, steady dedication, and a desire to learn new skills. The rewards, from financial savings to immense personal satisfaction, are certainly worth the effort.
Remember to prioritize safety during every single phase of construction. Research your local codes thoroughly and never be afraid to seek expert advice when you need it. Your finished cabin will offer a unique escape or a sustainable living solution. Now you can embark on this journey with confidence and enjoy creating your own cozy retreat.

To ensure your project goes smoothly, we’ve compiled all these steps and tips into a single, convenient document. Our Ultimate DIY Cabin Builder’s Checklist is designed to keep you on track from the first sketch to the final coat of paint. It’s a practical tool to help you manage tasks, track materials, and avoid common mistakes. Download it below to start your build with confidence.
Sources
- Service Life of Pressure-Treated Wood Foundations with Drainage Systems (USDA Forest Products Laboratory, 2023)
- 2025 Construction Timeline Report (National Association of Home Builders Research Center, 2025)
- IRC Wall Bracing Code Compliance Guide for Builders (Applied Building Technology Group, 2024)
- International Residential Code Appendix Q: Tiny Houses (International Code Council, 2021)
- NFPA 70: National Electrical Code (NEC) 2023 Edition (National Fire Protection Association, 2023)
- 2024 Field Report: Common Violations in Owner-Built Dwellings (International Association of Electrical Inspectors, 2024)
- Lumber Price Forecast February 2026 (Trading Economics, 2026)
- Tiny House Statistics: Market & Trends (2026) (RubyHome, 2026)
- Permanent Wood Foundations Technical Guide (Canadian Wood Council, 2019)
- Internal Bracing Design Guide for Masonry Walls Under Construction (International Masonry Institute, 2015)