DIY Outdoor Shower: A Comprehensive Guide
Nothing ruins a freshly cleaned home faster than muddy paw prints or sandy feet, making a DIY outdoor shower an essential upgrade rather than just a backyard luxury. As families spend more time expanding their living space into the garden, ignoring this simple addition guarantees dirty floors and endless cleaning, whereas the right setup instantly transforms a chaotic yard into a functional, spa-like retreat. Mastering this build adds immediate property value without the contractor price tag, and you can grab the downloadable checklist at the end to get started immediately.
Property Value Insight: Do Outdoor Showers Increase ROI?
Yes. According to 2024 Zillow research analyzing nearly 1 million sales, homes with an outdoor shower sell for 2.6% more than expected.
- The Appeal: For a median-priced home, this feature serves as a high-ROI “lifestyle signal,” transforming a standard backyard into a luxury retreat.
- Best ROI Locations: Coastal properties, vacation rentals, and suburban homes with pools.
Understanding the Benefits of a DIY Outdoor Shower
Many homeowners view an outdoor rinse station as a luxury reserved for beach houses or tropical resorts, but it serves a far more practical purpose for the average suburban home. It acts as a hygiene barrier between the raw elements of nature and the pristine interior of a house.
Enhancing Your Outdoor Space
A vertical shower structure anchors flat landscapes effectively for properties under ¼ acre where sightlines feel exposed. However, on wooded lots over 1 acre with natural screening, a low-profile rinse station often blends better without competing with existing vertical elements like trees. Landscape architects often use vertical structures to break up the monotony of a flat lawn or a sprawling patio. By incorporating specific DIY outdoor shower ideas, a homeowner can create a visual focal point that draws the eye.
Integration with Nature
Natural materials like cedar create ‘successful’ projects (defined as 10+ years of use without major repairs) for permanent residences in USDA zones 5–9. However, for vacation rentals with high tenant turnover, powder-coated aluminum requires less maintenance and avoids the ‘weathered look’ that renters often mistake for neglect.
Cedar holds up 8–12 years in humid zones (like the Southeast) before turning silver-gray, but lasts 15+ years in dry climates (think Arizona). Redwood beats cedar by 3–5 years in coastal salt air but costs 40% more upfront. A structure flanked by climbing hydrangeas or tall bamboo creates a “secret garden” effect, offering privacy while maintaining an open-air feel.
Practical Uses for an Outdoor Shower
The utility of these units extends far beyond a post-swim rinse. For households with active children or pets, it becomes the most used plumbing fixture on the property during the summer months.
The Pet Washing Station
Washing a seventy-pound Labrador in a standard bathtub is a back-breaking, messy ordeal that often clogs indoor drains with fur. A dedicated DIY outdoor shower allows for mess-free grooming. The water drains directly into the soil or a dry well, and the dog can shake dry on the grass rather than in the hallway.
Gardening and Yard Work
After a long day of weeding or mowing, a person is often covered in dust, pollen, and sweat. Stepping into a DIY outdoor shower prevents these allergens from entering the home’s HVAC system. It serves as a decontamination zone, keeping the indoor air quality higher and the laundry load lighter.
Boosting Property Value
Real estate markets favor homes that offer “experiential” living. A functional DIY outdoor shower signals to buyers that the property is designed for leisure and entertainment. While it might not add square footage, it adds “lifestyle value,” which can be the tipping point in a competitive sale.
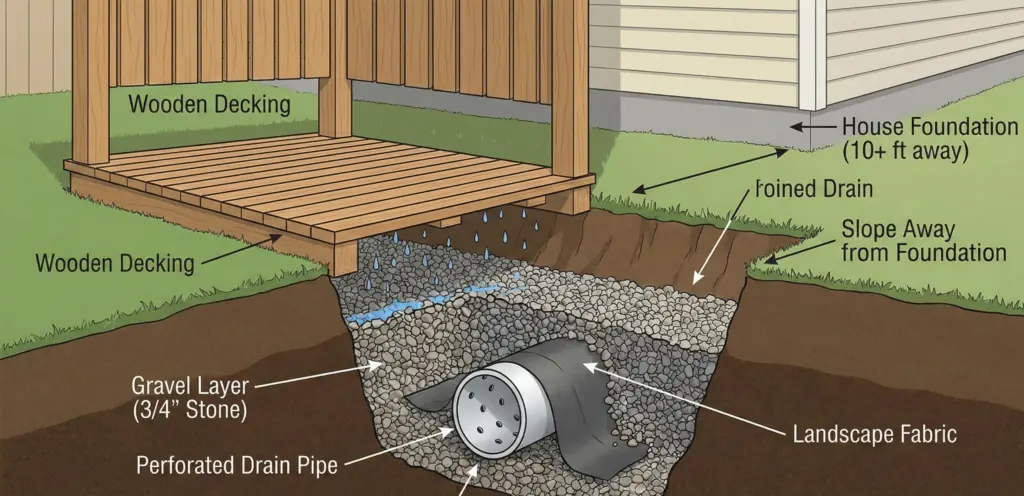
Always position the structure where it receives direct sunlight for at least four hours a day to prevent mold growth on wooden slats, and ensure it sits at least ten feet from the home’s foundation to avoid water seepage into the basement.
To ensure the build meets local codes and structural standards, consulting an outdoor shower plans pdf before digging is crucial for long-term durability.
Site selection follows a 4-point checklist:
- Sun exposure – minimum 4 hours of direct sun daily for drying;
- Distance from foundation – minimum 10 feet to prevent water intrusion;
- Wind protection – position leeward of prevailing winds or install partial windbreaks;
- Utility access – within 15 feet of existing water source to minimize trenching costs.
Sketch your yard on graph paper and mark these zones before purchasing materials.
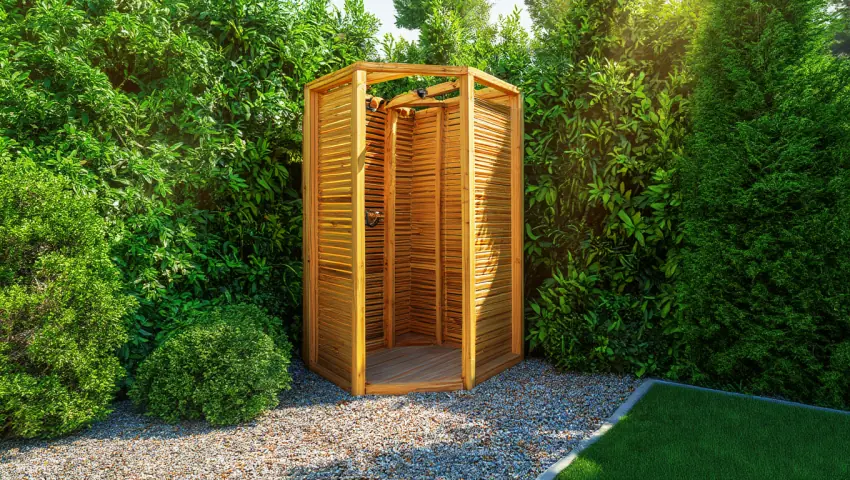
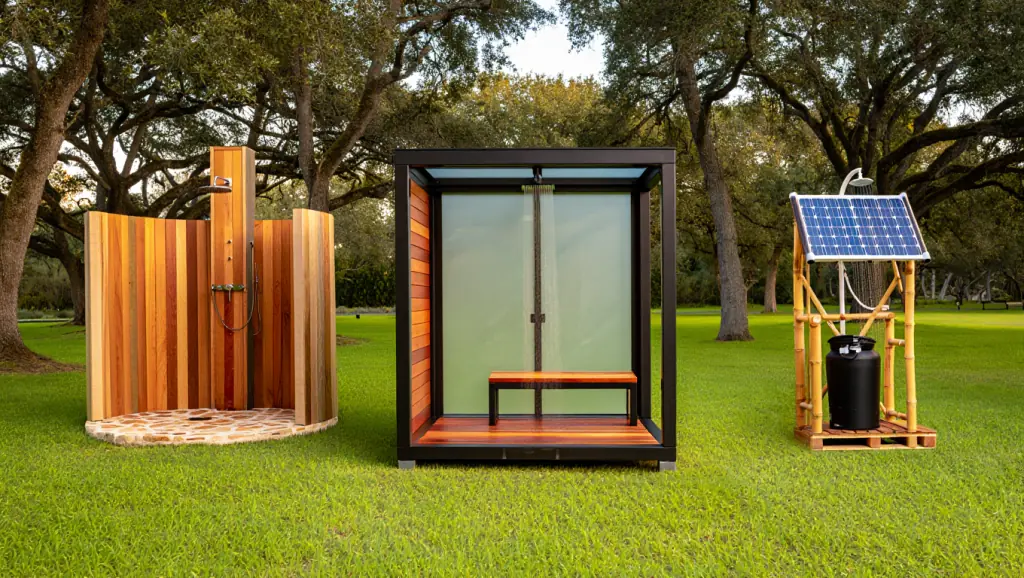
DIY Outdoor Shower Ideas to Inspire You
The beauty of a DIY outdoor shower lies in its versatility. Unlike indoor bathrooms, which are confined by walls and standard plumbing codes, the backyard offers freedom. Whether the goal is a simple hose hookup or a hot-water oasis, there is a style to match every architectural vibe.
Rustic and Natural Designs
For homes surrounded by trees or located in rural areas, rustic DIY outdoor shower ideas work best. These designs embrace imperfections and raw textures.
Using Reclaimed Materials
Builders often source old barn wood, driftwood, or leftover slate tiles to construct the privacy screen. The key here is sealing the wood properly. A rustic look should not mean a rotting structure.
- Tree Mounts: If a sturdy oak tree is available, mounting the fixture directly to the trunk (using strap mounts to avoid hurting the tree) creates a zero-footprint shower.
- Stone Floors: Use 1–2 inch river rocks laid 3–4 inches deep over landscape fabric—anything smaller clogs with silt, anything larger feels unstable underfoot.”
Modern and Sleek Concepts
Contemporary homes demand clean lines and industrial materials. Here, the focus shifts from blending in to making a statement.
- Industrial Metals: Corrugated galvanized steel or copper piping left exposed creates a striking visual contrast against green foliage.
- Concrete Walls: Smooth-poured concrete or large-format pavers offer privacy and a minimalist aesthetic that is easy to clean.
This video showcases a fantastic transformation that balances modern aesthetics with DIY achievability. It demonstrates how to mix wood and metal for a look that feels high-end but is built with standard hardware store components.
Eco-Friendly Shower Solutions
Sustainability is a massive driver for modern renovations. Many DIY outdoor shower ideas focus on water conservation and low energy impact.
Solar Heating Systems
Passive solar heating is incredibly effective. By coiling black irrigation tubing on a nearby roof or top of the shower frame, the sun heats the water inside the pipe. It is free hot water, provided the sun is shining.
Greywater Gardens
Instead of sending water into a sewer, eco-conscious builders direct the runoff to water-loving plants.
- Papyrus and Ferns: These thrive in wet soil and act as natural filters.
- Biodegradable Soaps: Essential for this setup to avoid damaging the soil pH.
“When certain home features or design styles are highlighted in a listing description, they serve as a signal to a buyer …” — Amanda Pendleton, Zillow home trends expert (Zillow Group).
How to Choose the Right DIY Outdoor Shower Kit
Not everyone has the time or carpentry skills to build a structure from scratch. This is where DIY outdoor shower kits save the day. They provide a balance between customization and convenience, delivering pre-engineered plumbing and fixtures that are ready to install.
Components of a Typical Kit
Understanding what is in the box is the first step to avoiding frustration.
- The Column: Usually a stainless steel or wooden tower that houses the pipes.
- The Mixer: A valve that blends hot and cold water (if applicable).
- The Foot Rinse: A lower spigot essential for washing sand off feet without getting the whole body wet.
- Anchoring Hardware: Bolts or screws to secure the unit to a deck or concrete pad.
Comparing Popular Kits
| Feature | Wall-Mounted Kit | Freestanding Tower | Solar-Powered Kit |
| Installation | Requires drilling into siding | Requires concrete/wood base | Minimal (connects to hose) |
| Plumbing | Hard-piped through wall | Underground or hose feed | Garden hose input |
| Water Temp | Hot & Cold | Hot & Cold | Warm (Solar dependent) |
| Durability | High (fewer moving parts) | High (if marine grade) | Medium (plastic parts) |
| Best For | Proximity to house plumbing | Poolside or garden center | Renters / Temporary setups |
This comparison highlights that while DIY outdoor shower kits vary in complexity, the wall-mounted options generally offer the best reliability for permanent hot water, whereas solar kits are unbeatable for ease of installation.
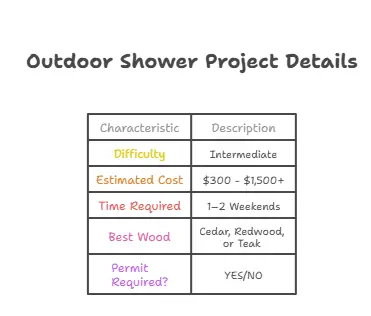
Budget expectations vary significantly by material quality and plumbing complexity. Basic cold-water kits start around $250–$400 (e.g., Sunflow or Aqua Eden models), while marine-grade stainless steel units with thermostatic valves range from $800–$1,500. Custom builds using pressure-treated lumber and PEX plumbing typically cost $600–$1,200 in materials for a 4’×4′ structure, excluding labor. Coastal installations require 316-grade stainless hardware ($120–$200 premium over standard fittings) to resist salt corrosion.
Tips for Selecting the Best Kit for Your Needs
When shopping for DIY outdoor shower kits, the material grade is the most critical factor.
- Coastal Areas: Look for 316 Marine-Grade Stainless Steel. Standard 304 steel will develop tea-colored rust stains within months due to salt air.
- Freeze Protection: Ensure the kit has a quick-release mechanism or easily accessible drainage plugs. If water gets trapped inside the complex valves of a kit during winter, it will crack the housing.
Solid brass or marine-grade stainless is non-negotiable for permanent hot-water installations within 5 miles of saltwater coastlines. But for seasonal cold-water rinse stations used 3–4 months yearly in dry climates, quality chrome-plated brass holds up fine for 5–7 years at half the price.
Step-by-Step Outdoor Shower Plans
Building a custom DIY outdoor shower allows for perfect sizing and features. Success lies in the preparation. Before buying a single board, downloading a detailed outdoor shower plans pdf is highly recommended to visualize the cuts and material waste.
Gathering Necessary Materials and Tools
A project is only as smooth as the preparation. A typical materials list includes:
- Lumber: 4×4 pressure-treated posts for the frame, cedar or mahogany for decking and privacy slats.
- Plumbing: ½-inch PEX tubing (Color-coded red and blue), SharkBite fittings, and a frost-free sillcock.
- Drainage: Crushed gravel (¾ inch stone) and landscape fabric.
- Tools: Post-hole digger, circular saw, drill driver, level, and PEX crimping tool (if not using push-to-connect fittings).
How to Build a DIY Outdoor Shower (Step-by-Step)
Follow this plumbing and carpentry protocol for a durable structure:
- Excavate for Drainage: Dig a pit 12 inches deep and 3×3 feet wide at the center. Fill with crushed gravel (¾ inch stone) to prevent standing water.
- Set the Posts: Install four 4×4 pressure-treated posts using fast-setting concrete. Bury them 30–36 inches deep (or below your local frost line).
- Install the Frame: Connect the posts with 2×4 stringers. Lay rot-resistant decking (Cedar or Mahogany) with ⅛-inch gaps for water runoff.
- Run the Plumbing: Run ½-inch PEX tubing from the house to the shower. Bury lines 18 inches deep to prevent freezing and accidental damage.
- Mount the Fixtures: Secure the mixer valve at chest height (approx. 48–54 inches) and connect the showerhead using a drop-ear elbow.
Installing Plumbing and Fixtures
Plumbing outdoors is often easier than indoors because wall access is open.
- Route the Lines: Run PEX tubing from the water source to the shower location. Bury lines at least 18 inches deep if running them underground to protect against accidental shovel hits.
- Connect the Fixtures: Secure the shower valve to a wooden brace at chest height.
- Test for Leaks: Turn the water on before closing up any wall panels.
PPI’s Technical Report TR-52 explains that the inherent flexibility of PEX typically allows it to expand during a freeze event without cracking or splitting, then return to its original diameter upon thawing. (2020, Plastics Pipe Institute).
I chose this video because it focuses heavily on the “french drain” aspect. Many DIYers ruin their foundation by ignoring where the water goes. This guide explains how to dig a proper dry well that keeps your yard from turning into a swamp.
Advanced Plumbing Tip
If the plan involves hot water, the easiest method is tapping into the home’s hot water heater lines and running them through the wall. If that is too invasive, a portable propane tankless water heater is a fantastic alternative that hangs directly on the DIY outdoor shower frame.
Maintenance and Care for Your Outdoor Shower
Once the build is complete, the focus shifts to preservation. A DIY outdoor shower is exposed to sun, rain, and snow, meaning it needs more love than your indoor bathroom.
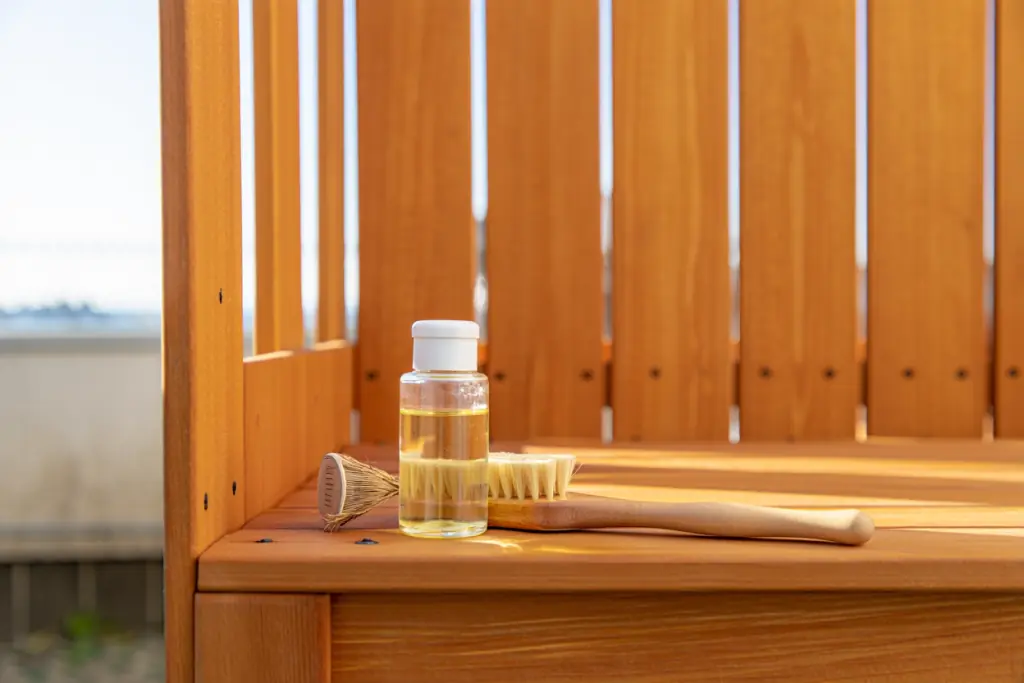
Regular Cleaning and Upkeep
Wood needs protection from UV rays and moisture.
- Sealing: Seal cedar every 6 months if you get 40+ inches of annual rainfall (Pacific Northwest), but once every 18 months works fine in desert climates under 15 inches of rain. This prevents the wood from turning grey and splintering.
- Fixture Polishing: Wipe down stainless steel fixtures with a microfiber cloth and WD-40 or specialized oil to prevent surface corrosion.
- Mold Prevention: Scrub the floorboards with a mixture of water and vinegar to kill algae spores that make the surface slippery.
Winterizing Your Outdoor Shower
In colder climates, winterizing your DIY outdoor shower is non-negotiable.
- Isolate the Supply: Turn off the shut-off valve inside the house that leads to the outdoor lines.
- Open the Valves: Leave the outdoor faucet handles in the “open” position.
- Blow Out Lines: If the setup uses underground pipes, using an air compressor to blow out remaining water ensures no pockets freeze and burst. DIY outdoor shower kits often have specific instructions for this.
Drainage beats insulation for freeze protection in climates with sustained sub-20°F temperatures lasting 48+ hours (like Minnesota winters). However, in ‘shoulder season’ zones (Pacific Northwest) where temps dip below freezing for only 6–12 hours overnight, foam pipe insulation combined with a slow drip can prevent bursts without full drainage
Troubleshooting Common Issues
Even with the best outdoor shower plans pdf, issues can arise.
- Low Water Pressure: If your showerhead delivers under 1.5 GPM (gallons per minute)—test by filling a 1-gallon bucket in under 40 seconds—you’ve got mineral buildup or an undersized supply line.
- Leaky Valves: Rubber washers degrade faster outdoors due to temperature fluctuations. Keep a spare set of washers handy for quick replacements.
- Warped Privacy Screen: If boards start to cup or twist, it usually means they were installed without room for expansion. Loosening the screws slightly can sometimes alleviate the tension.
FAQs About DIY Outdoor Showers
Can I Build an Outdoor Shower Without Plumbing?
Yes, and it is a popular option. Many DIY outdoor shower ideas utilize a simple garden hose connection. You can buy a specialized shower attachment that screws directly onto a standard hose. This eliminates the need for cutting pipes or soldering. While the water will be cold (unless the hose has been sitting in the sun), it is a perfect, low-cost solution for rinsing off pool water or beach sand.
What Permits Are Needed for an Outdoor Shower?
It depends. Simple cold-water rinse stations often don’t need a permit. However, if you run permanent hot water pipes or connect to the sewer line, a plumbing permit is required. If the shower connects to the home’s main sewer line or requires new hot water piping, a plumbing permit is almost always required. However, simple cold-water rinse stations that drain into the ground often fall into a “landscaping” grey area. However, some municipalities have strict rules about “greywater” (soapy water) entering the soil. Always check local zoning laws and consult an outdoor shower plans pdf that adheres to code before starting construction.
How Long Does It Take to Build a DIY Outdoor Shower?
The timeline depends on complexity. A simple hose-fed unit with a pre-made privacy screen can be assembled in a single afternoon. A fully plumbed, hot-and-cold system with a concrete base and custom carpentry is typically a two-weekend project. Using DIY outdoor shower kits can significantly speed up the process by eliminating the need to engineer the plumbing manifold yourself.
Additional Resources and Outdoor Shower Plans PDF
For those ready to take the plunge, having the right diagrams is half the battle.
Where to Find Detailed Plans
Architectural forums and woodworking communities are goldmines. Look for threads where users share their specific material lists. A high-quality outdoor shower plans pdf will always include a “cut list,” which minimizes lumber waste and saves money.
Recommended Reading and Guides
Landscape design blogs often feature DIY outdoor shower ideas that focus on the “hardscaping” aspect—how to integrate stone and drainage effectively. Reading up on “permeable pavers” is highly recommended for creating a base that looks good and drains well.
Downloadable Outdoor Shower Plans PDFs
University agricultural extensions often provide free, technically accurate blueprints for small outdoor structures. Searching for “University Extension outdoor shower plans pdf” can yield professional-grade drawings that are safer and more durable than amateur sketches found on social media.
In a 2023 industry post, the National Association of Landscape Professionals reported that 92% of landscape professionals saw increased consumer demand for contracting outdoor features during the pandemic. (2023, National Association of Landscape Professionals).
“It’s no surprise that nearly all Realtors and most homeowners place a high value on the curb appeal of a well-maintained yard.” — Britt Wood, CEO (Chief Executive Officer) of the National Association of Landscape Professionals (NALP).
Conclusion
Building a DIY outdoor shower is more than a home improvement project; it is an investment in a cleaner, more enjoyable lifestyle. Whether the choice falls on a complex hot-water build or one of the simple DIY outdoor shower kits, the result is a private sanctuary that keeps the mess outside and the relaxation high. By following a solid plan and respecting the drainage requirements, any homeowner can create a durable, valuable addition to their property.
Now that the strategy is clear, the next step is gathering the specific materials. Start by assessing the sunlight in your yard to pick the perfect spot, then download a reliable outdoor shower plans pdf to guide the cuts.
Would you like me to generate a specific shopping list for a “Rustic Cedar” or “Modern Industrial” build to help you get started at the hardware store?
Use this guide to ensure you don’t miss a single step, from digging the post holes to tightening the final valve.

Drop a comment below: What is the biggest challenge preventing you from building your outdoor oasis—plumbing fears or design indecision?
Sources
- Choice backyard features can help homes sell for $10,000 more. (2024, Zillow Research).
- TR-52/2020: Resistance of PEX Pipe and Tubing to Breakage When Frozen (Freeze-Break Resistance). (2020, Plastics Pipe Institute).
- Tricked-out backyards can help homes sell for $10,000 more. (Amanda Pendleton, 2024, PRNewswire / Zillow Group).
- E17 | Outdoor Shower | Ask This Old House. (2025, PBS).
- How to Install Drainage for an Outdoor Shower. (2025, This Old House).